How to install and run a Pi-hole, a beginners guide
To start things off, I want to talk about some of the projects I have been working on. I currently have a very humble home lab. It consists of a Raspberry Pi 3, a one terabyte hard drive, a windows laptop, and a Linux laptop. I plan on upgrading in the future as required by various projects. I eventually want to have a NAS on my network as well as do some web hosting and maybe a few other things as they come up.


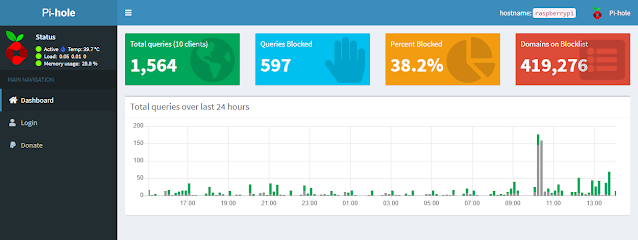
One of my very first projects was to set up a Pi Hole on my LAN to act as a DNS sink hole for ads. Pictured below is the admin screen for my Pi Hole. I am going to give you a play-by-play with a few explanations of what certain functions are, and how they work as I understand them. I kinda wish I had an easy to follow guide when I first did this. I was a brand new linux user and had no idea what I was doing at first. This is the product of many failed attempts and lots of googling.
Installing Pi Hole was fairly straight forward. I had previously downloaded and installed Raspberry Pi OS to my Raspberry Pi. I then went to pi-hole.net and clicked on the "INSTALL PI-HOLE" button. This takes you to the GitHub page with a few installation options. The easiest option is the curl command to transfer the install data to my Raspberry Pi.
To do this, you simply copy and paste this command into the Terminal and press "Enter". I put the "sudo" command in this script just before the final "bash" command. This is not required for the installation to go through but it does run the script as the "Root User".
This command runs a shell script that downloads the installation files and runs the install program. This script uses "https" which provides for a basic level of authentication and encryption. This prevents the file from being manipulated by nefarious actors. Just in case you are concerned about that sort of thing.
Once installed you will see the Pi Hole Automated Installer.
It will take you through a few screens one of which talks about needing a static IP address to be assigned to the Raspberry Pi. This is simple to do and can be done in your router settings.
The installer will ask you what connection you are using (Ethernet or Wireless). I recommend using the Ethernet connection if you are able. Wireless signals can suffer from interference and if you are in an area with many different wireless signals, your wireless speed can suffer greatly. However, Wireless is convenient so I understand if you use that instead.
The Installer then asks you to select your Upstream DNS Provider. I use OpenDNS because it is supported by Cisco. I also use OpenDNS for Web Content Filtering and some basic Malware/Botnet Protection. You can choose whatever DNS provider you want. Side Note: DNS stands for Domain Name System. Its kinda like a big phone book for the internet that translates domain names such as agaboutme.com or google.com into IP addresses that internet browsers can use to send and receive data.
The next screen asks what pre-made white and black lists you would like your Pi-Hole to use. A whitelist is a list of web addresses that are known good addresses. This is a "don't block" list. A blacklist is the exact opposite. It is a list of known untrustworthy addresses that are known for malware or ads. There are other pre-made lists available. I'll talk about those in the next post. By default, all of the lists are selected. I left it that way and selected next.
You will then be asked you which IP protocols you would like to block ads on. IPv4 and IPv6 are both selected by default. IPv6 is being used more and will only increase in use so to fully block ads you will need to scan both IPv4 addresses as well as IPv6 addresses. Leave the boxes checked and select next.
The next window asks you if you want to use your current (DHCP assigned) IP address as the static IP address for Pi Hole. You could use a different IP address such as 192.168.0.2 or any other IP address you would like but you must make sure that the IP address is the same on your router settings.
On a slightly related note, using the standard 192.168.x.x IP address in your LAN while not a terrible idea, could cause you to be more vulnerable to attack. That IP address is a well known IP address for SOHO (small office, home office) routers. I suggest changing your IP address on your router to something different. This is security through obscurity, and not true security but every bit helps, right?Also make sure you have changed the default admin password on your router too. That is just a good practice.
The next page remind you to make sure that the IP address is reserved in your DHCP pool on your router. They say this multiple times so it is important. Additionally, you can set up your Raspberry Pi to be your DHCP server, which would eliminate the need to change router settings. I, however, just change my router settings because I'm ok with using my router for DHCP. Its personal preference.
This page pops up and shows you which IPv6 address will be used to block ads.
This page just asks you if you want to install the web admin interface. Select yes because its cool to look at your stats. It also allows you to change a number of settings as well as add addresses to your white and blacklists.
The next page asks if you want to install the web server lighttpd. Lighttpd is a web server that has a relatively small footprint compared to other servers. It requires a smaller amount of memory and does not need much processing power to run. You can read more about it here: lighttpd. A web server is required to run the Pi-Hole web interface and lighttpd solves this problem. Select "On" and go to the next page.
The Installer will then ask you if you want to log queries. The answer to this is yes. You are going to want to know which clients on your LAN are querying what and why they are doing it. This helps give you a better idea of what your computer, tablet, phone, etc. are doing when you browse the Internet. It also shows you what your devices are doing when you are NOT browsing. I have a cheap WiFi camera in my house that was constantly sending queries. The log helped me identify this and eliminate it. Select "On" and go to the next page.
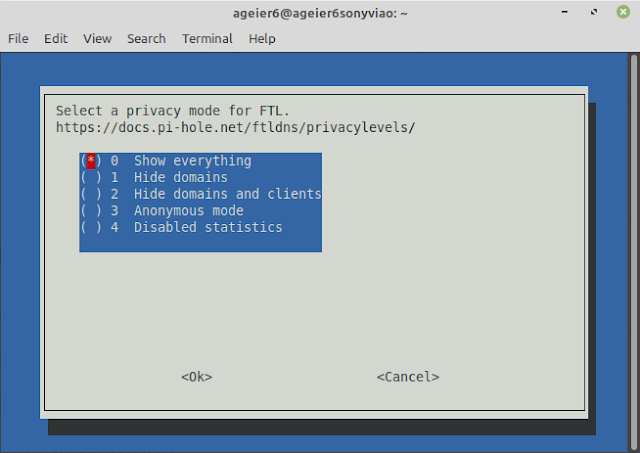
The installer then asks what privacy level you wish to have with those logs or FTL. This would be useful if you were living with a roommate and you don't want to know what or where they are surfing. I already know what websites I visit, and my girlfriend only uses Facebook and Pintrest, so not a big deal. I select "Show Everything" and move on.
Finally, after all that is set up the installer gets to work. Give it time to do its thing and your pi-hole will be set up and ready to go in no time. After a few minutes the installer will show a screen notifying you that the installation is complete. It will give you the IPv4 and IPv6 address for your Pi Hole. It will state where on your Raspberry Pi the logs are stored. It will give you the web address for your Pi Hole web interface (this should be the IP address you configured during the setup). It will also give you a web interface admin password. That is important to write it down and save it. If you want to change your password to something you'll actually remember, use the command "pihole -a -p" in your terminal.
That's it! That's how to download and install Pi-Hole on your Raspberry Pi. To test it out all you need to do is go to your favorite ad heavy website. I used CNN or BBC and cant definitely tell a difference. In the next few days, I will post about how I added to my white and blacklists to capture even more ads. Additionally I will talk about monitoring logs and how to figure out what the information means. If you have any questions or comments please feel free to comment below.
Comments
Post a Comment